
Month: August 2026

Designing an Extension That Feels Like It Was Always Part of the House

scanning an architectural blueprint

A successful home extension should respond to the proportions, materials, layout, and architectural character of the existing property. Guidance from Historic England stresses the importance of understanding a building’s character and setting when planning alterations. Without that connection, even a beautifully finished new room can feel noticeably separate from the rest of the house.

Many of these problems can be addressed before building work begins. When working with The Extension Company, for example, architectural and interior choices can be considered during the extension-design stage, when decisions about floor levels, structural openings, windows, lighting, and materials are still flexible. This early coordination also matters because extensions may need to meet Building Regulations covering structure, insulation, ventilation, fire safety, drainage, and electrical work, as outlined by the Planning Portal.

Step 1: Understand What Makes the Existing House Work

Start by examining the rooms that will connect directly to the extension. Ceiling heights, window proportions, door styles, skirting boards, flooring, fireplaces, and other architectural details all contribute to the character of a home.

Historic England advises homeowners to understand a property’s significance and previous alterations before making further changes. Although this guidance is especially relevant to older and historic buildings, the basic design principle applies more widely. Knowing what gives a house its identity makes it easier to decide which features should continue into the new space.

This does not mean copying every detail. A contemporary extension can sit successfully beside an older interior. The objective is to create a relationship between the two, rather than making the extension appear to belong to a completely different property.

Step 2: Use Flooring to Create a Natural Transition

Flooring is one of the most visible connections between adjoining spaces. Continuing the same timber, tile, stone, or similar material through the original room and extension can make the boundary less obvious. Where identical flooring is impractical, closely related colours, plank sizes, textures, or laying patterns can provide visual continuity.

Finished floor levels deserve attention at the same stage. Differences in structural build-up, insulation, or underfloor heating can affect the final height. If this is discovered too late, homeowners may end up with an unwanted step or threshold between spaces.

Discussing finished levels before construction gives designers and builders more opportunity to resolve these differences within the floor structure.

Step 3: Look Up at Ceiling Heights

Homeowners naturally focus on floor plans, but ceilings have a major influence on how connected rooms feel. Moving from a traditional room with a relatively low ceiling into a dramatically taller extension creates an obvious transition. That contrast may be desirable, but it should be intentional.

Consider how ceiling lines relate to door openings, structural beams, windows, cornices, and built-in furniture. Even when ceiling heights differ, repeating certain horizontal lines can establish a visual connection.

Rooflights and vaulted ceilings also need careful positioning. They can bring daylight deep into an extension, but their placement should support the overall composition of the room rather than simply filling available roof space.

Step 4: Test the Sightlines Before Building

Stand in the existing living room, hallway, kitchen, or dining area and imagine what will be visible through the new opening. These views, known as sightlines, influence how people experience the extension long before they physically enter it.

Historic England identifies elements including views, scale, light, shade, colour, texture, and patterns as factors that contribute to visual composition. Applying these ideas inside a home can help designers frame attractive views through connected spaces.

A doorway might align with a garden window, for instance, while a kitchen island could be positioned so it does not obstruct the view from the original room. Reviewing three-dimensional drawings or standing at key viewpoints with the plans can reveal issues that are easy to overlook on a standard floor plan.

Step 5: Plan Natural and Artificial Light Together

Rear extensions often introduce larger areas of glazing, rooflights, or glazed doors. These features can substantially change how daylight moves through the property. However, adding glass to the extension does not automatically make the original rooms brighter.

Historic England recommends considering how an extension could affect existing windows and daylight. A deep extension, for example, may place an existing room farther away from an external wall, making careful positioning of openings and rooflights particularly important.

Artificial lighting should be planned with the same level of care. Rather than treating the new room as a separate lighting project, consider the entire connected area. Similar colour temperatures, fixture finishes, and combinations of ambient, task, and accent lighting can make old and new spaces feel more consistent after dark.

Step 6: Build a Simple Material and Colour Palette

A seamless interior does not require every finish to match. Repeating a limited number of materials can create enough visual rhythm to connect different architectural periods.

Timber used in existing flooring might reappear in kitchen cabinetry or shelving. A metal finish from original door hardware could influence taps or light fittings. Similar principles of consistent design choices can also be seen in the way interior designers use coordinated colours, materials, and visual elements to establish a recognisable style. Within an extension, wall colours can continue through connecting spaces, while slightly different shades distinguish individual zones without creating a sharp break.

The Planning Portal encourages consideration of how extension materials and design relate to the existing property. Complementary materials can therefore be just as useful as exact matches, particularly where homeowners want the addition to remain identifiable as a newer part of the building.

Step 7: Check the Design Before Construction Starts

Changes made on drawings are generally easier to manage than changes made once walls, floors, and services are being installed. Before approving the final design, homeowners can review several practical points:

  • Check finished floor levels across the old and new spaces.
  • Compare ceiling heights, window proportions, and door openings.
  • Review views from the main existing rooms into the extension.
  • Confirm where daylight will reach at different times of day.
  • Coordinate artificial lighting across connected spaces.
  • Place flooring, paint, cabinetry, and material samples together.
  • Confirm relevant planning and Building Regulations requirements.
  • Check where structural beams, radiators, sockets, and switches will appear.

Making Old and New Feel Connected

An extension does not need to hide the fact that it is new. Older houses naturally evolve, and contemporary architecture can provide a clear contrast to traditional features. What matters is that the transition feels considered rather than accidental.

Flooring, ceiling heights, sightlines, light, materials, and colour all contribute to that experience. Resolving these elements during the design process gives homeowners a clearer picture of how the completed spaces will work together. The result can be an extension with its own character that still feels comfortably rooted in the house it was built to expand.
Posted by Deacon Aureole in Interior Design

6 Ways to Create Better Views from Windows Without Redesigning the Entire Room

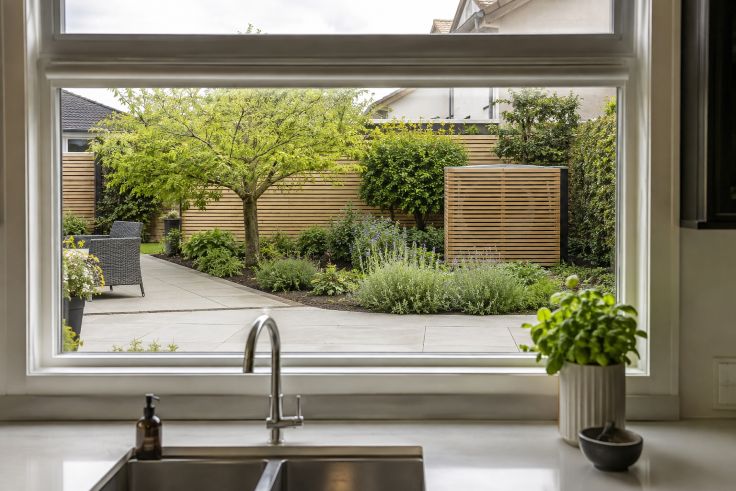
Kitchen Window Overlooking a Garden Patio

Views of natural surroundings through windows have been associated with positive health and wellbeing outcomes. A 2025 meta-analysis indexed by PubMed reviewed 28 studies and found consistently positive associations between viewing nature through windows and measures of psychological, physiological and physical health. For homeowners, this suggests that improving what can be seen outside may change the experience of a room without requiring major interior work.

The most effective improvements often begin directly outside the glass. Tidying planting, relocating storage or reducing the visual impact of equipment can make an existing window feel more thoughtfully positioned. Where a heat pump sits within a prominent sightline, for example, a Vaillant cover may be considered as a way to make the unit less visually dominant, provided any enclosure is appropriate for the equipment and does not interfere with its required operation or airflow.

1. Start by Organizing What the Window Actually Frames

Before buying plants or adding decorative features, stand at the places where the window is normally viewed. This might be a sofa, dining chair, kitchen counter or desk. Identify what attracts attention first and which objects interrupt an otherwise pleasant scene.

Simple organization can make a noticeable difference. Move unused pots, bins, hoses and gardening equipment away from important sightlines. Group items that need to remain outside rather than scattering them across the garden. The goal is not to create a perfectly empty landscape, but to give the eye a clearer route through the view.

Research published through the National Library of Medicine has examined specific characteristics of window scenes and found that perceived amounts of nature, visible sky and other visual features can contribute to how people assess view quality. This makes the composition beyond the glass worth considering rather than treating the garden as separate from the interior.

2. Build the View Around Planting

Once clutter has been reduced, look for areas where planting could provide a stronger focal point. Start with what is already growing successfully. A mature shrub, attractive tree or established border may simply need pruning or better organization around it.

The Royal Horticultural Society recommends choosing plants that suit their location and growing conditions. Its sustainable planting guidance also encourages combinations that support biodiversity while reducing unnecessary demands for water and other resources.

Think in layers when viewing planting from indoors. Low plants can fill bare ground, medium-height shrubs can create depth, and taller vegetation can provide a background. Seasonal changes matter too. Mixing suitable evergreen and deciduous plants can prevent the scene from becoming completely bare during colder months while allowing the view to change naturally throughout the year.

3. Give Outdoor Storage a Less Prominent Position

Storage is practical, but its location can unintentionally dominate a window. Wheelie bins, recycling containers, gardening tools and children’s outdoor equipment are often placed where they are easiest to reach rather than where they are least noticeable.

Walk outside and examine alternative positions before investing in new storage. Moving a container a few metres to the side of a building or behind existing planting may be enough. Where relocation is impractical, a suitable storage enclosure or screen can help organize several objects into one visually contained area.

Accessibility should remain part of the decision. Frequently used items still need to be easy to reach, so the aim is to balance appearance with everyday practicality.

4. Use Outdoor Lighting Selectively

A window does not stop contributing to a room after sunset. Carefully positioned exterior lighting can reveal a pathway, textured planting or another useful feature, giving the window some visual interest during darker hours.

More lighting is not necessarily better. The Royal Horticultural Society advises keeping garden lighting low, directing it toward areas where illumination is needed and avoiding unnecessary upward light. Its guidance also notes that excessive artificial lighting can disrupt nocturnal wildlife, including insects and bats.

For a window-facing garden, this means concentrating light on a limited number of features rather than flooding the entire space. Warm, low-intensity lighting around paths or selected plants can provide useful illumination while reducing glare through the glass.

5. Reconsider Where Outdoor Equipment Sits

Modern homes may have heat pumps, air-conditioning equipment, water systems and other mechanical installations positioned near exterior walls. These objects serve practical purposes, yet their placement can become particularly noticeable when they sit directly outside frequently used windows.

If equipment has not yet been installed, discuss sightlines alongside technical requirements when choosing its location. Existing equipment is more complicated because moving it may involve professional work and technical restrictions. Screening can sometimes provide an alternative, particularly when the goal is blending functional features with the surrounding design, but any solution should still preserve access, ventilation and manufacturer requirements.

This is an area where appearance should follow function. Any proposed screen or enclosure should be assessed with the equipment’s installation guidance in mind rather than being chosen solely because it looks attractive from indoors.

6. Add Screening Without Blocking Everything

Screening works best when it hides a specific distraction rather than closing off the entire outlook. A narrow section of slatted screening, carefully positioned planting or another suitable outdoor barrier may conceal bins, neighbouring service areas or equipment while preserving trees, sky and open garden space.

Evidence published by PubMed in 2024 found that study participants who could see at least three trees through their windows reported higher nature connectedness and mental wellbeing than those without that visibility, although the researchers described the mediating effect as limited. The finding supports a broader principle: where greenery already exists, improvements should ideally preserve useful natural views rather than replace them with solid barriers.

Test screening positions before making them permanent. A temporary panel, garden cane or even another person standing at the proposed height can help determine how much coverage is actually necessary when viewed from inside.

A Better Window View Can Start Outside

Improving a window view does not always require moving furniture, replacing glazing or redesigning an entire room. Often, the more practical approach is to examine what the window frames and make small changes beyond it.

Organized gardens, layered planting, discreet storage, restrained lighting, thoughtful equipment placement and selective screening can all contribute to a calmer and more intentional outlook. The best solution will depend on the property, but the principle remains simple: preserve the elements worth seeing, reduce unnecessary visual distractions and allow practical outdoor features to coexist with the view.

Posted by Deacon Aureole in Interior Design

How Nursery Interior Design Can Support Better Baby Sleep

A nursery has to do more than look good in photos. It is a room where a baby may sleep, feed, play, and be comforted several times a day. And while interior design cannot make a baby sleep through the night, thoughtful choices can create an environment that makes rest easier and bedtime less stimulating.

The most useful nursery designs balance comfort, safety, and practicality. A baby sleep consultant may also suggest creating a calm, consistent sleep environment that supports a baby’s bedtime routine. Instead of filling the room with decorations, parents can focus on features that support a peaceful atmosphere and simplify nighttime care.

Start With a Safe Sleep Area

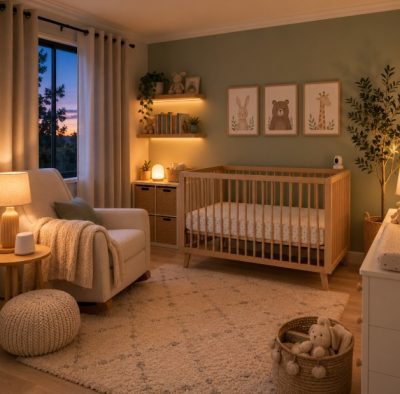
The crib is naturally the center of a sleep-focused nursery. Its location and setup deserve more attention than decorative details. Place the crib away from windows, curtain cords, heaters, lamps, and furniture that could eventually become accessible to a growing child. Follow current infant safe-sleep recommendations when choosing a crib and mattress and when deciding what belongs inside the sleep space.
A bare crib may look less decorative than one filled with pillows, blankets, and stuffed animals, but those accessories are not necessary for a sleeping baby. You can use decorative items elsewhere in the room without crowding the crib. Safety should remain the priority even when it means changing the original design idea.

Make It Easy to Control the Light

Light plays an important role in creating a nursery’s atmosphere. Bright daylight is useful when parents are feeding, dressing, and playing with their baby. At bedtime, softer lighting can help make the room feel quieter and less active.
Window coverings can help control outside light, particularly during daytime naps or in the summer when daylight lasts well into the evening. Choose coverings that do not leave accessible cords near the crib.
Lighting inside the room matters too. Instead of relying entirely on a bright ceiling fixture, consider a dimmable lamp or another soft light source for nighttime care. Parents need enough visibility to feed or change the baby safely without making the room unnecessarily bright.

Choose Colors for the Whole Atmosphere

No single paint color will make babies sleep better. Parents don’t have to limit themselves to beige, gray, or pale blue just because they are decorating a nursery.
However, it helps to think about how all the colors in the room work together. Very bright walls combined with bold patterns, colorful furniture, and numerous decorations can make a small space feel busy.
Muted or softer shades often make it easier to create a visually restful room. Parents who enjoy brighter colors can introduce them through artwork, storage baskets, rugs, or other accents rather than using intense colors on every surface. The aim is balance, not a nursery without personality.

Reduce Visual Clutter

Babies come with a surprising amount of equipment. Clothes, diapers, wipes, toys, books, blankets, and feeding supplies can quickly cover every available surface.
Good storage can keep the nursery calmer and make nighttime care more efficient. Frequently used items should be easy for adults to reach, while less-used belongings can be stored in drawers, closets, or closed containers.
A changing area, for example, works better when diapers, wipes, and spare clothes have assigned places. Parents are less likely to turn on bright lights or search through the room during a middle-of-the-night change.
Storage should also evolve as the baby becomes mobile. Furniture may need securing, and objects that were once safely out of reach can become accessible surprisingly quickly.

Think About Sound

Complete silence is not always realistic in a family home. Traffic, siblings, pets, appliances, and conversations may continue while the baby sleeps. Soft furnishings such as rugs and curtains can reduce echo in a room. A closed door may also help limit household noise, depending on the home’s layout.
Some families use white-noise machines as part of the sleep environment. If one is used, parents should follow appropriate guidance about volume and placement rather than positioning it loudly beside the crib. The goal is not necessarily to eliminate every sound. A consistent, comfortable environment is usually more practical than trying to keep an entire home silent.

Keep the Room Comfortable

Room temperature can affect how comfortable a baby feels while sleeping. Nursery design should therefore consider airflow and heating or cooling, not just appearance.
Avoid positioning the crib directly beside heating vents, radiators, air-conditioning units, or places with strong drafts. Heavy decorative fabrics can also affect airflow around certain parts of a room.
Parents should follow current guidance on comfortable sleep temperatures and appropriate sleep clothing for infants. Feeling the room for themselves can help, but babies may need different clothing than adults expect.

Design Nighttime Care Around Simplicity

A nursery becomes much easier to use when parents can move through it without fully waking themselves or their baby. Keep a clear path between the doorway, crib, feeding chair, and changing area. Avoid placing baskets, toys, or small furniture where tired adults could trip over them at night.
A comfortable chair can provide a practical place to feed or settle the baby. A small table nearby can hold essentials for the parent, as long as everything stays safely out of the baby’s reach. These details may seem minor during decorating, but they can matter at 3 a.m.

Let the Nursery Grow With the Baby

Babies change quickly, and nursery design needs to change with them. A room arranged for a newborn may need significant adjustments once that baby begins rolling, crawling, pulling up, and exploring.
For that reason, flexible furniture and simple layouts can be more useful than highly elaborate designs. Review the room regularly for safety as the child’s abilities develop.
A well-designed nursery does not guarantee longer naps or uninterrupted nights. Babies wake for many reasons that have nothing to do with décor. But a safe, comfortable, dimmable, organized space can make sleep routines easier to maintain. And when the room also makes nighttime care simpler for tired parents, good design does more than look attractive.
Posted by Shaelyn Yasmin in Interior Design